Appearance
How to Collect Reviews with a Fluent Forms Custom Source
The Fluent Forms source type allows you to collect new reviews directly from your website quickly and automatically.
With this feature, you can:
- Build a “Write a Review” form using Fluent Forms.
- Automatically send submitted reviews into a dedicated Custom Source inside WP Social Ninja.
- Approve, manage, and display these reviews just like reviews from other platforms.
It’s the simple and easy way to gather authentic feedback from your customers and showcase it beautifully on your site.
Before You Begin: Create Your Form
Before you can use this feature, you must first create your review form in Fluent Forms. This form is the "entry point" for your reviews.
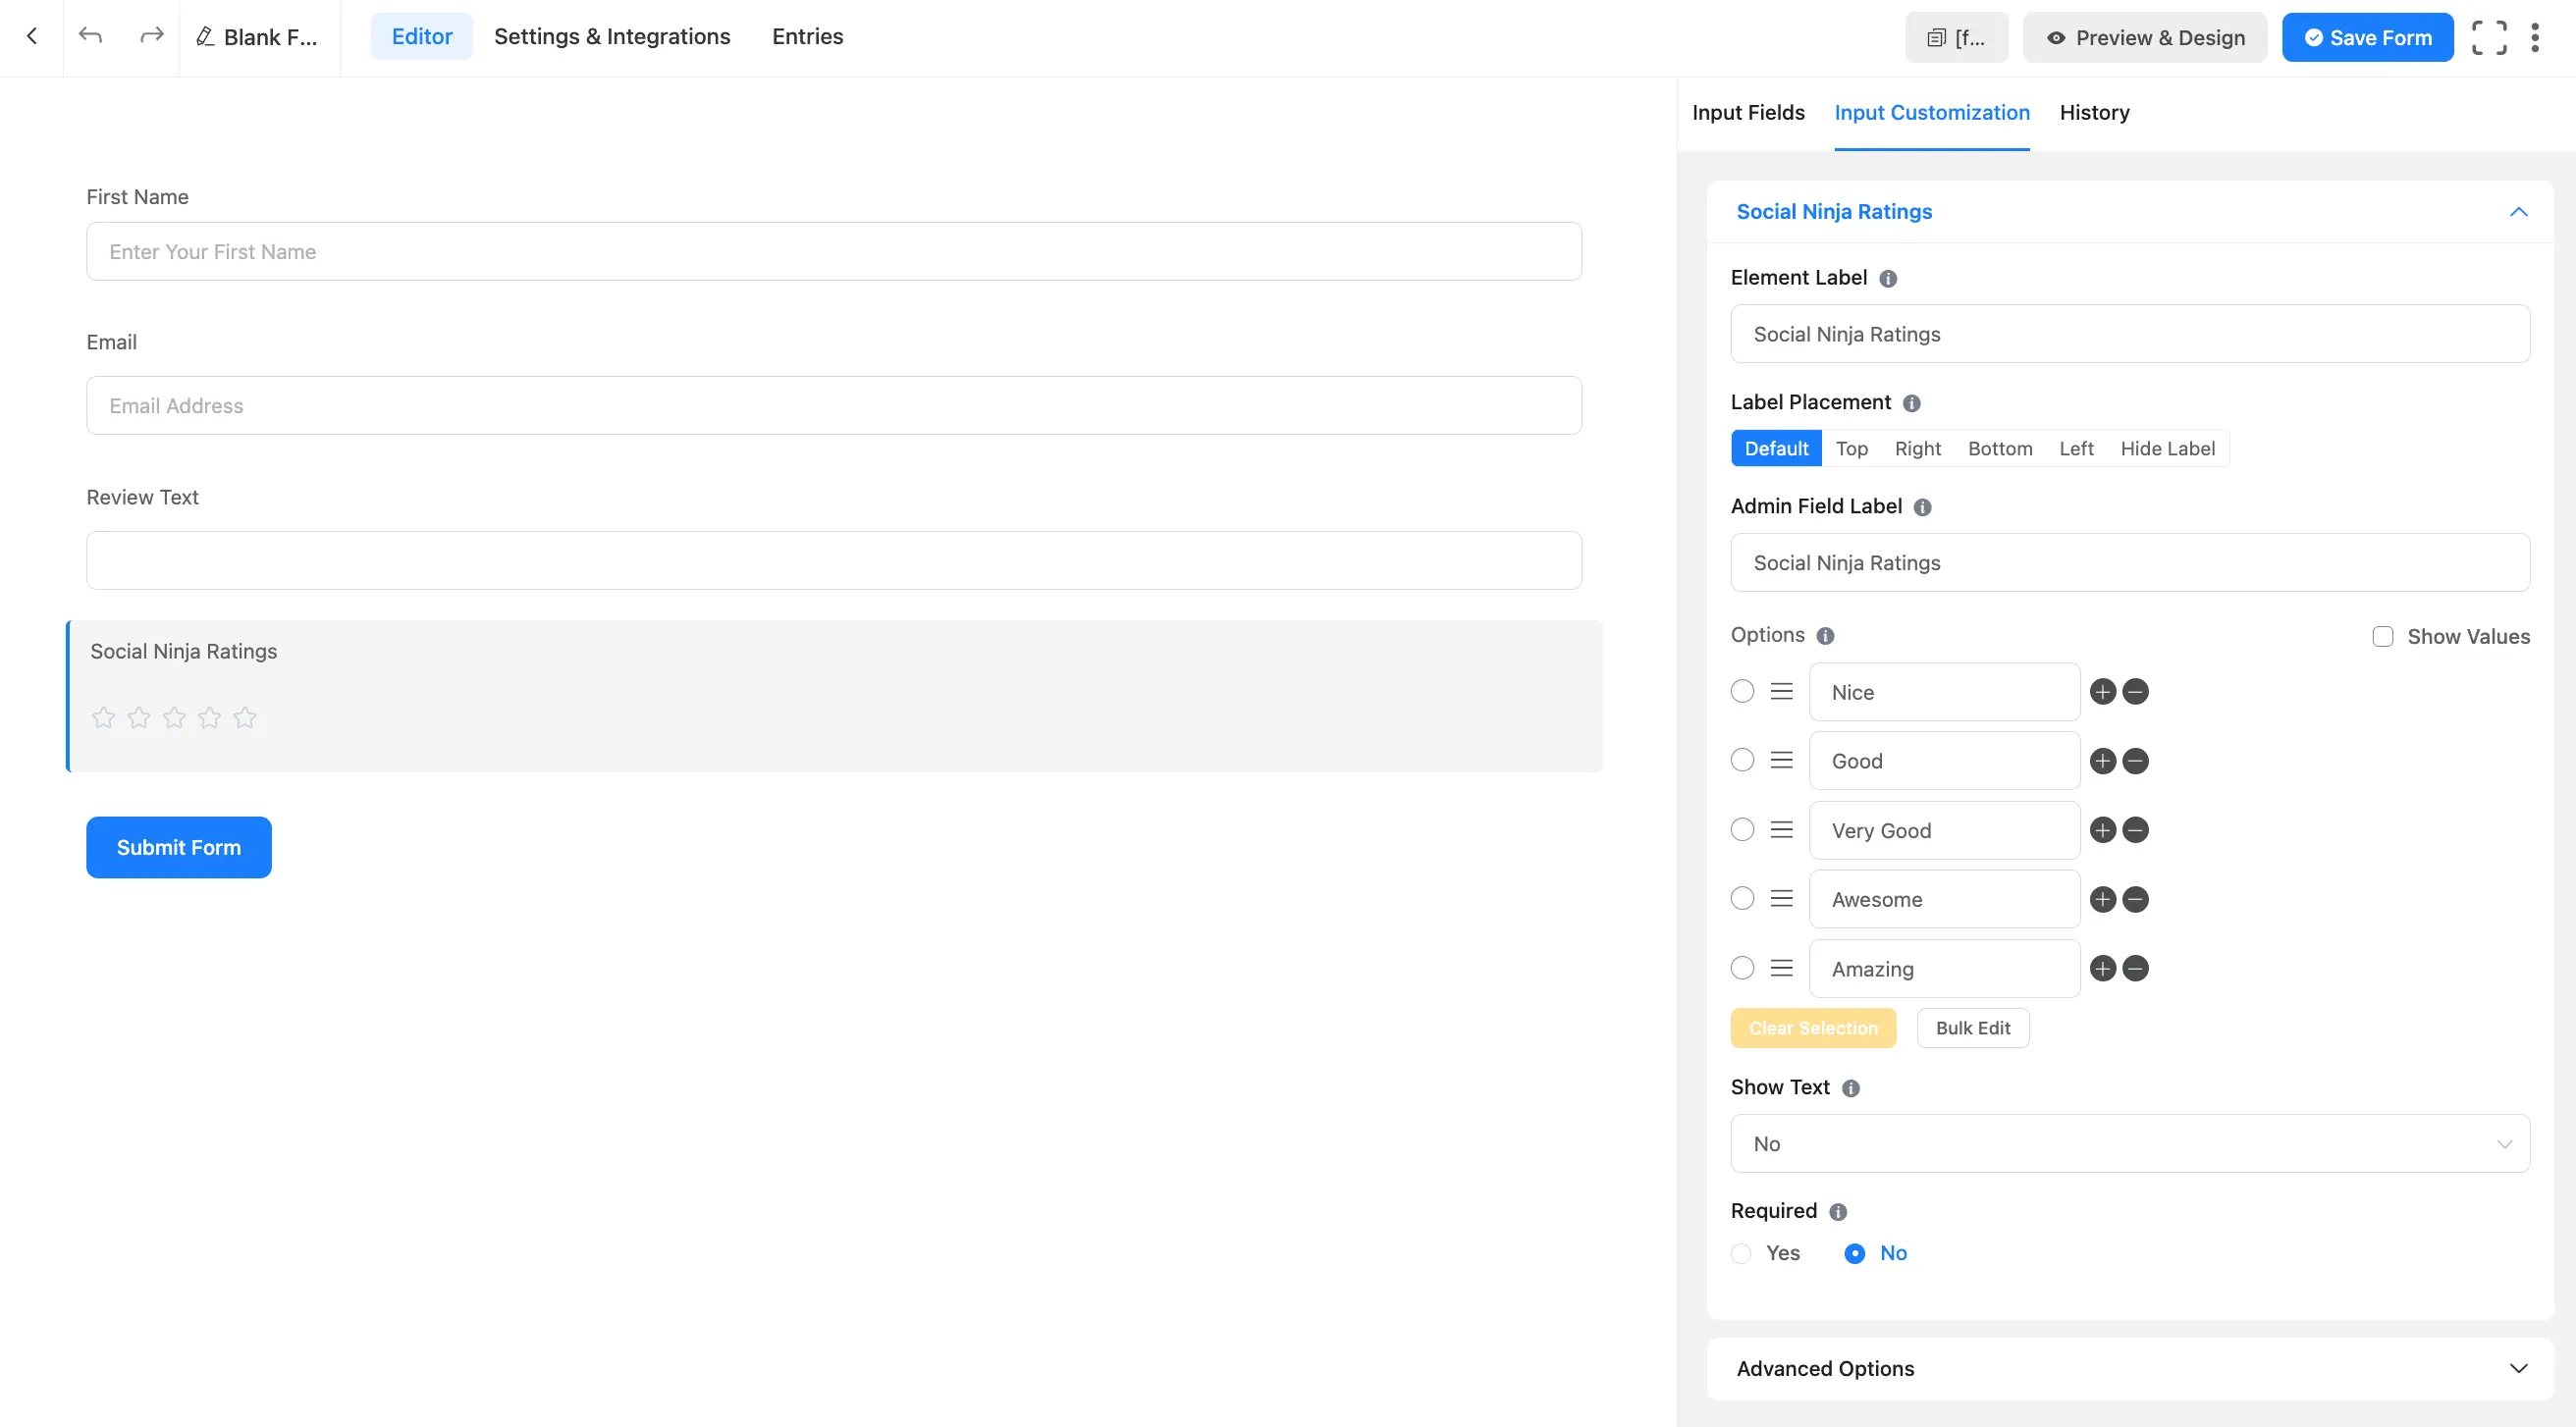
When building your form, you must include the "Social Ninja Rating" field (available in the Fluent Forms editor) for the star rating to work.
Step 1: Create Your "Fluent Forms" Source
First, you’ll need to create a dedicated source to receive your new form submissions.
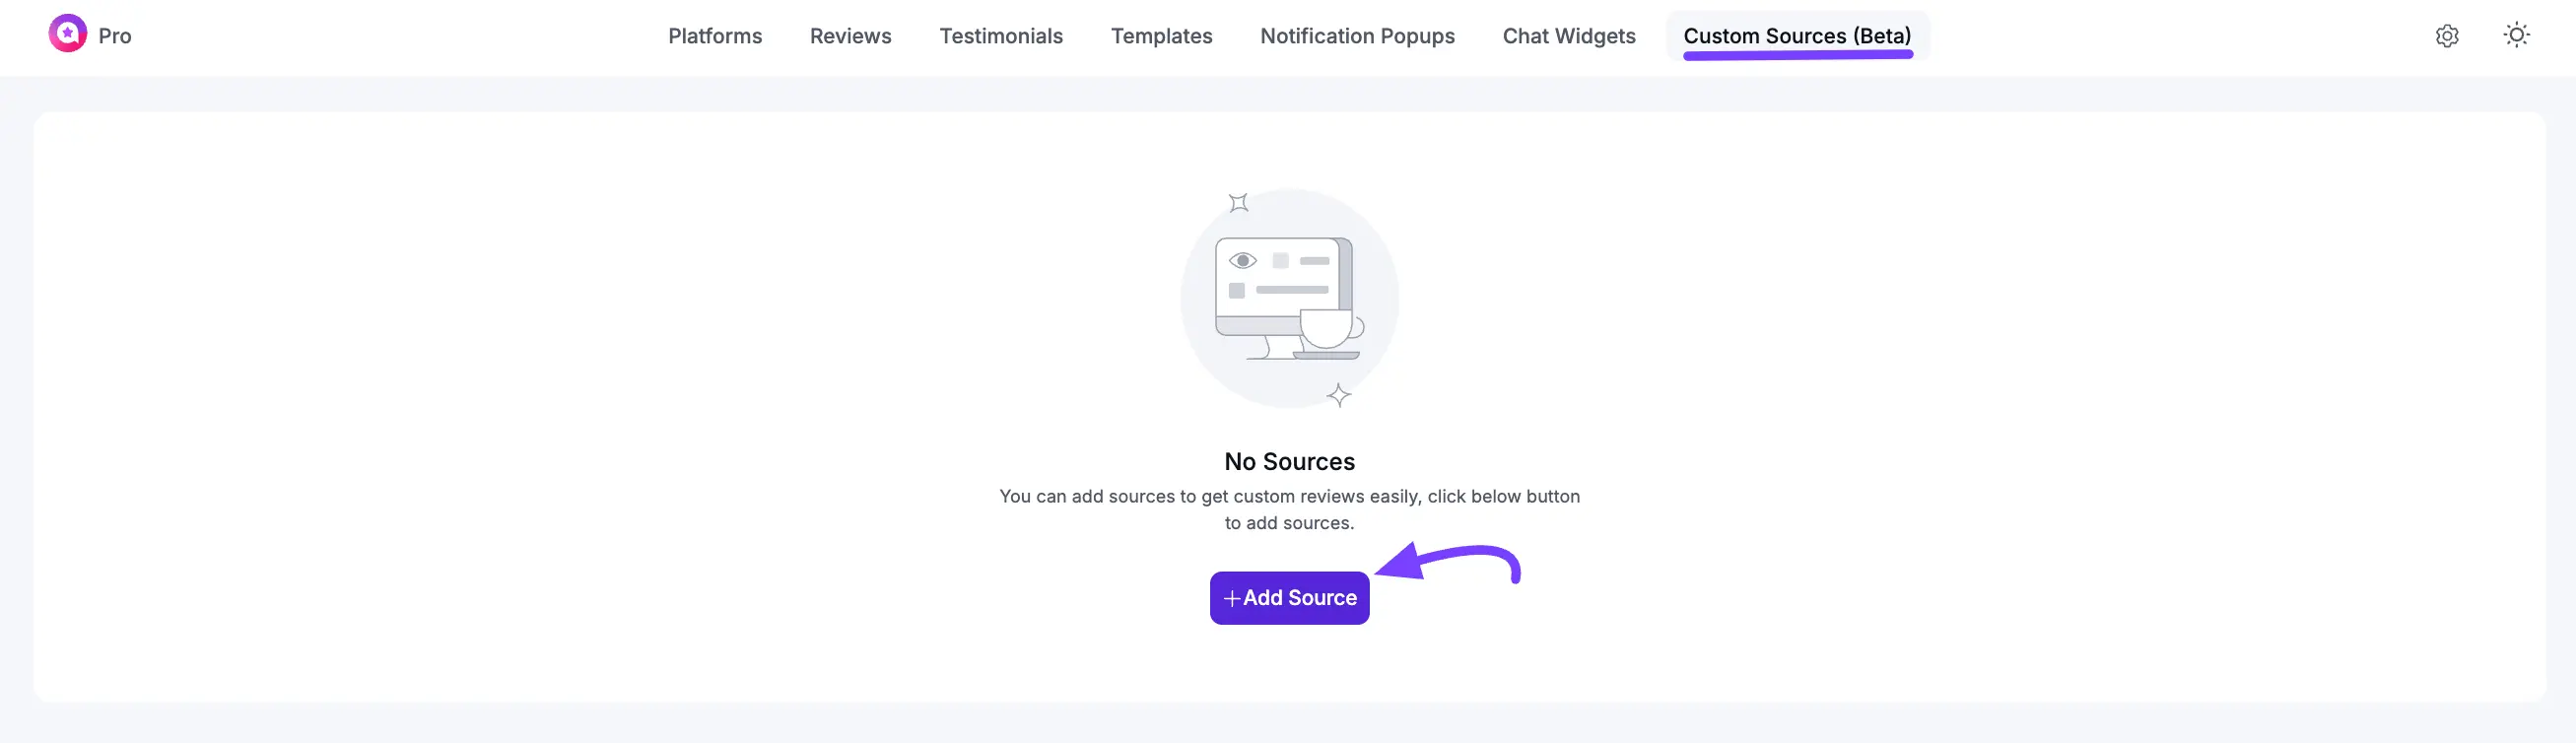
From your WordPress dashboard, go to WP Social Ninja → Custom Sources. Click the "+ Add Source" button.
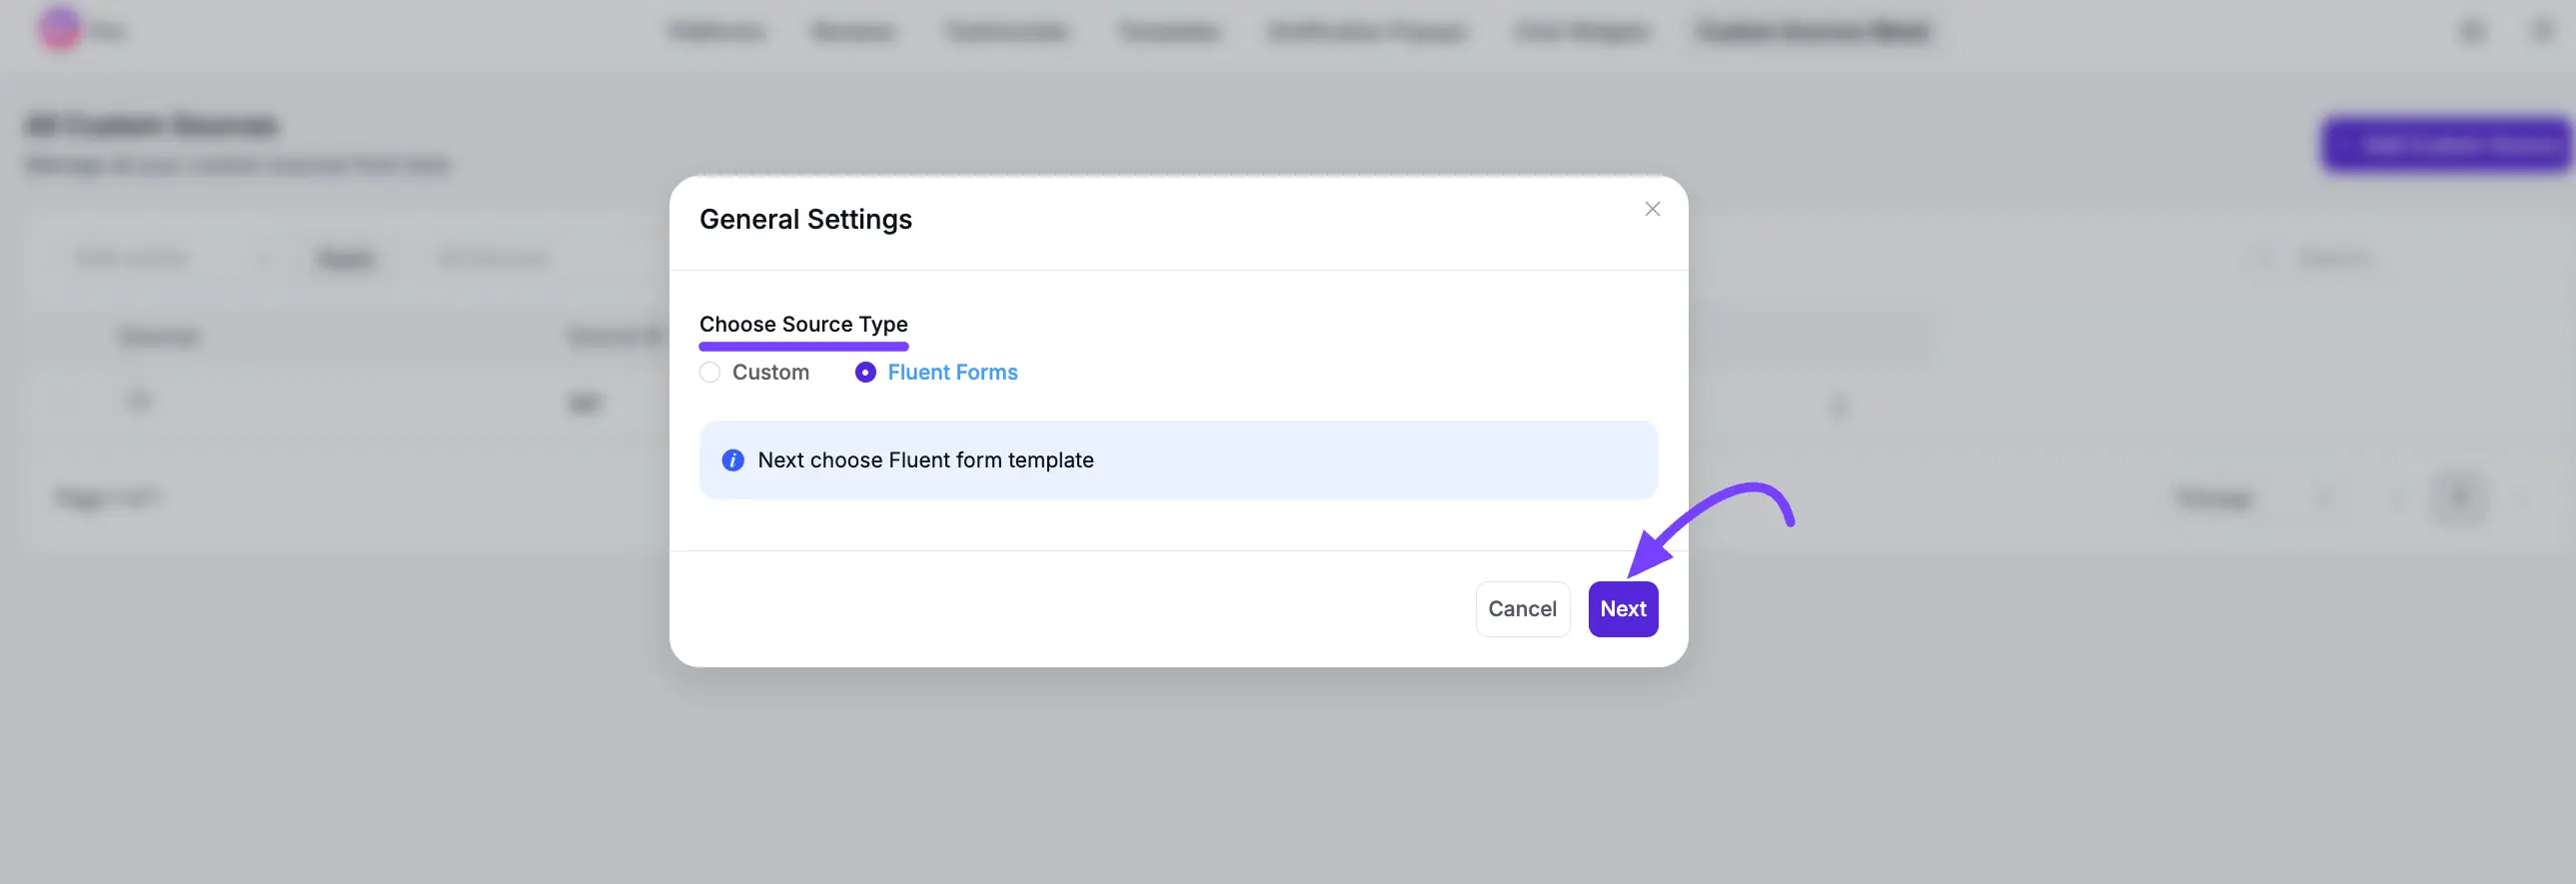
In the pop-up that appears, select Fluent Forms. Then, click the Next button.
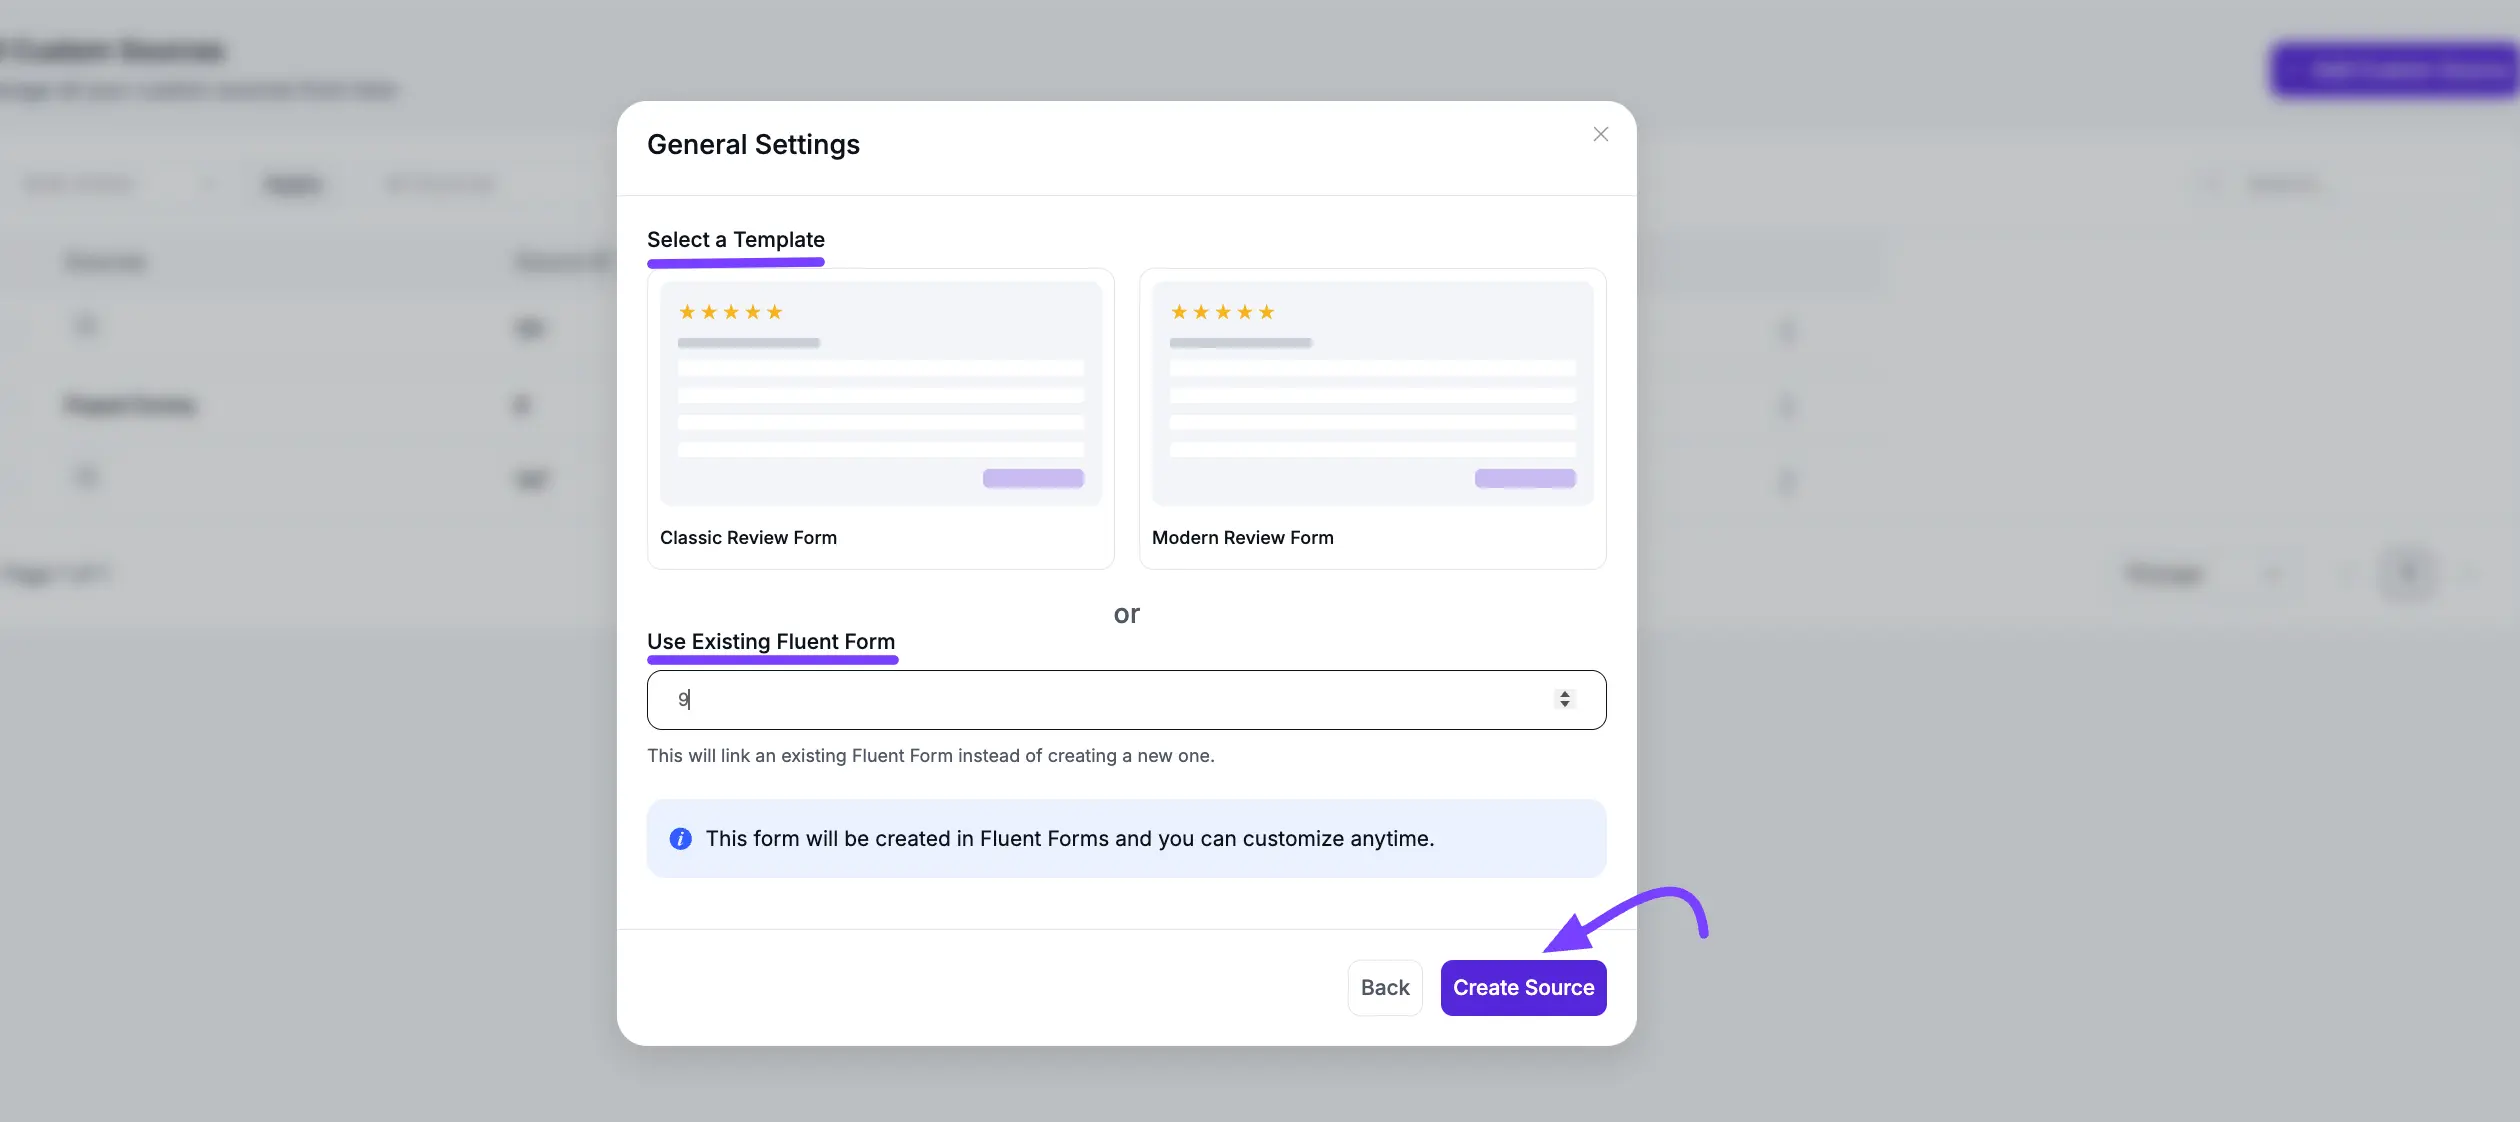
A new pop-up will appear under the General Settings section. Here, you can either select a template from the list or enter an existing Fluent Forms ID if you already have a form created. Once you’ve made your selection, click the Create Source button to proceed.
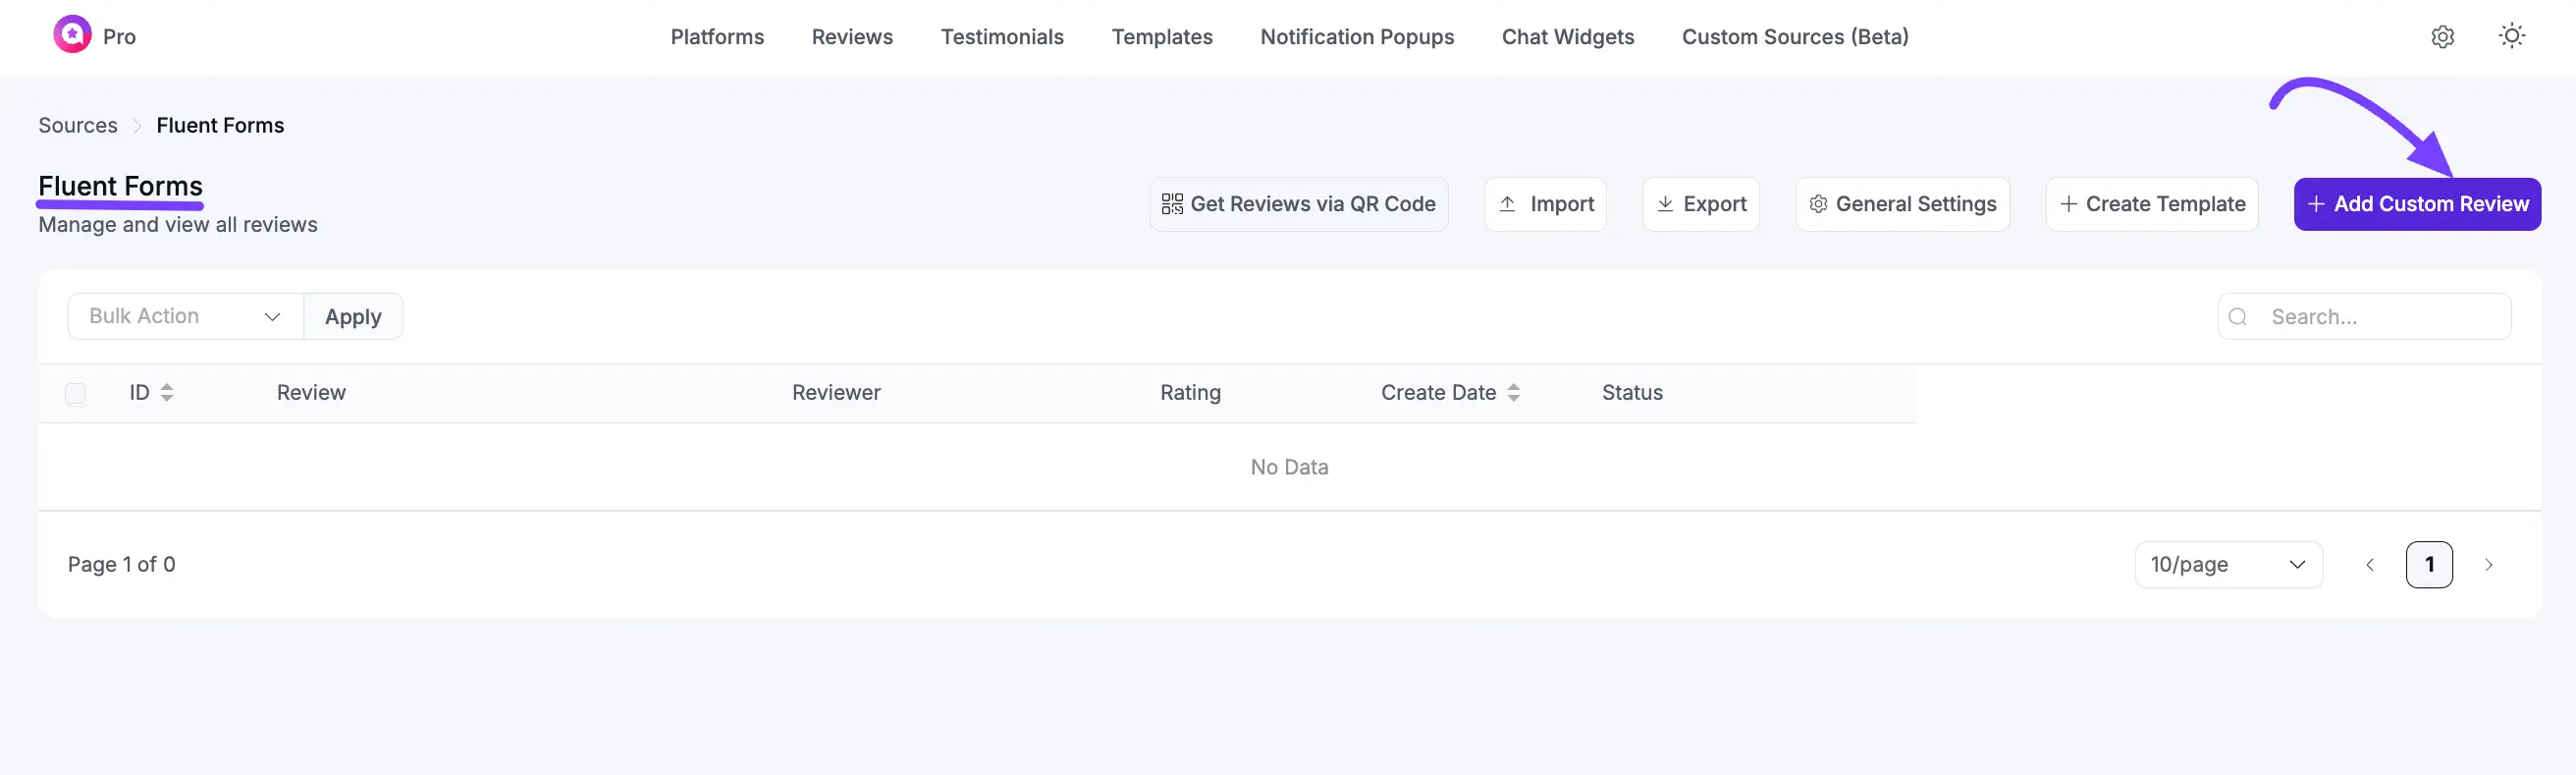
You’ll then be redirected to the dashboard of your newly created source. This dashboard will act as your new moderation queue, catching all the reviews that come from your connected form.
Step 2: Add Reviews to Your Source
You have two ways to add your existing reviews: manually (one by one) or by importing a file (in bulk).
Method A: Add Reviews Manually
This is the easiest and quickest way to add reviews.
Here you’ll see the source name on the left side. Now, on your source's dashboard, click the "+ Add Custom Review" button in the top-right corner.
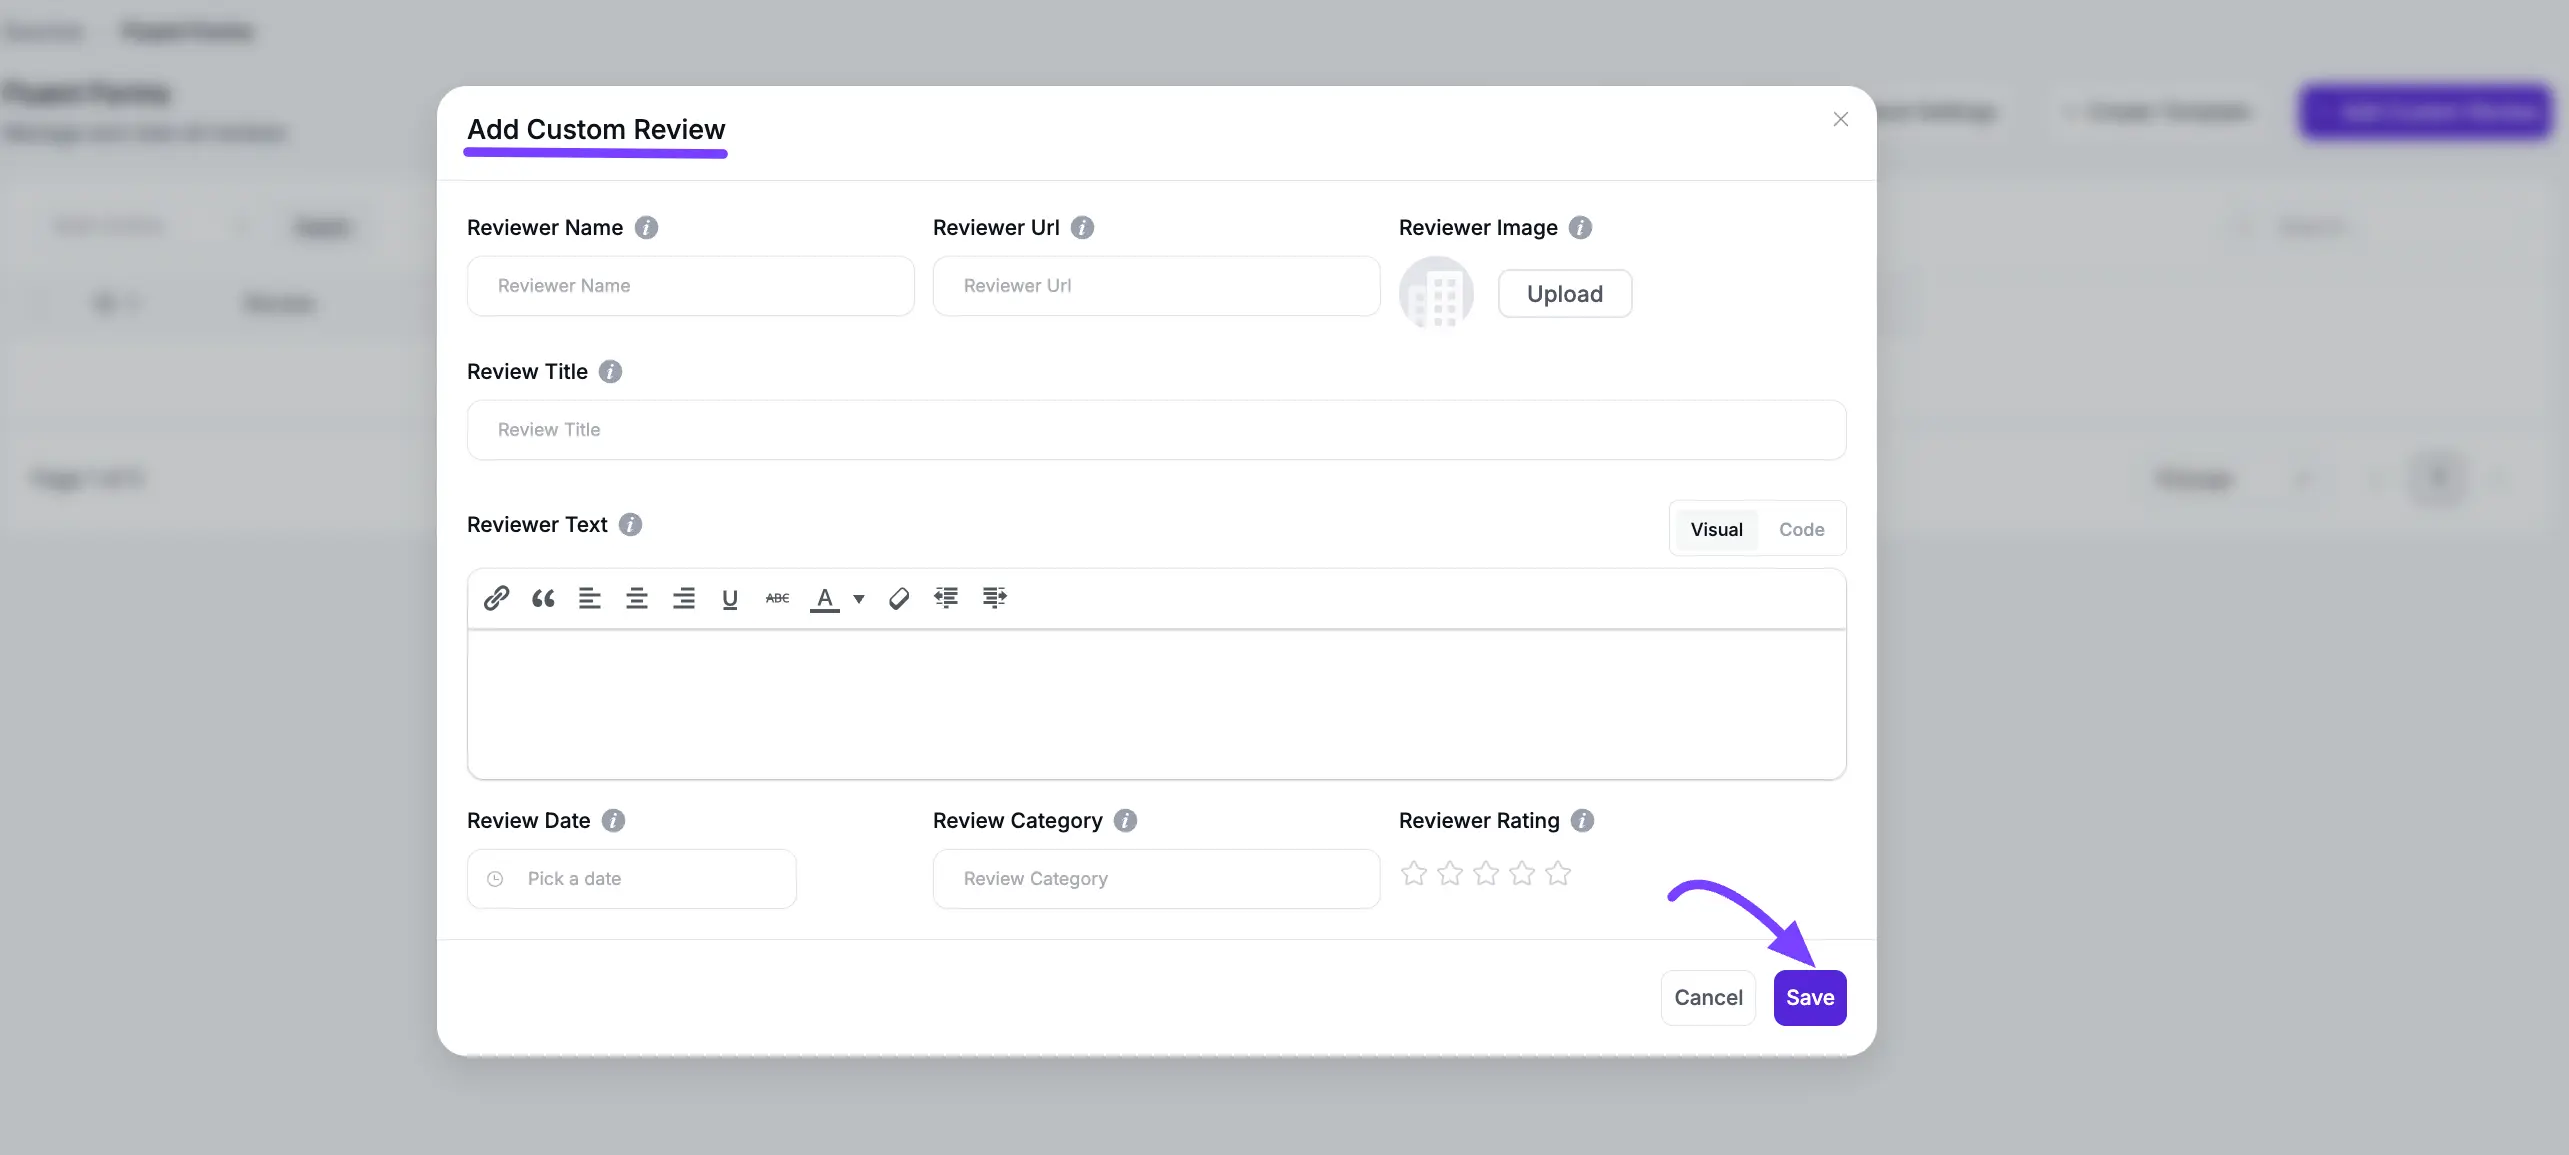
A detailed form will pop up. Fill in as much information as you can:
- Reviewer Name: The name of the person who left the review.
- Reviewer URL: A link to the reviewer's website or profile (optional).
- Reviewer Image: Upload a photo of the reviewer.
- Review Title: The headline of the review.
- Reviewer Text: The main content of the review.
- Review Date & Rating: The date and the 5-star rating.
After that, click the "Save" button. The review will now appear in your list.
Method B: Import Reviews from a CSV (in Bulk)
This method is the quickest way to upload a large number of reviews at once.
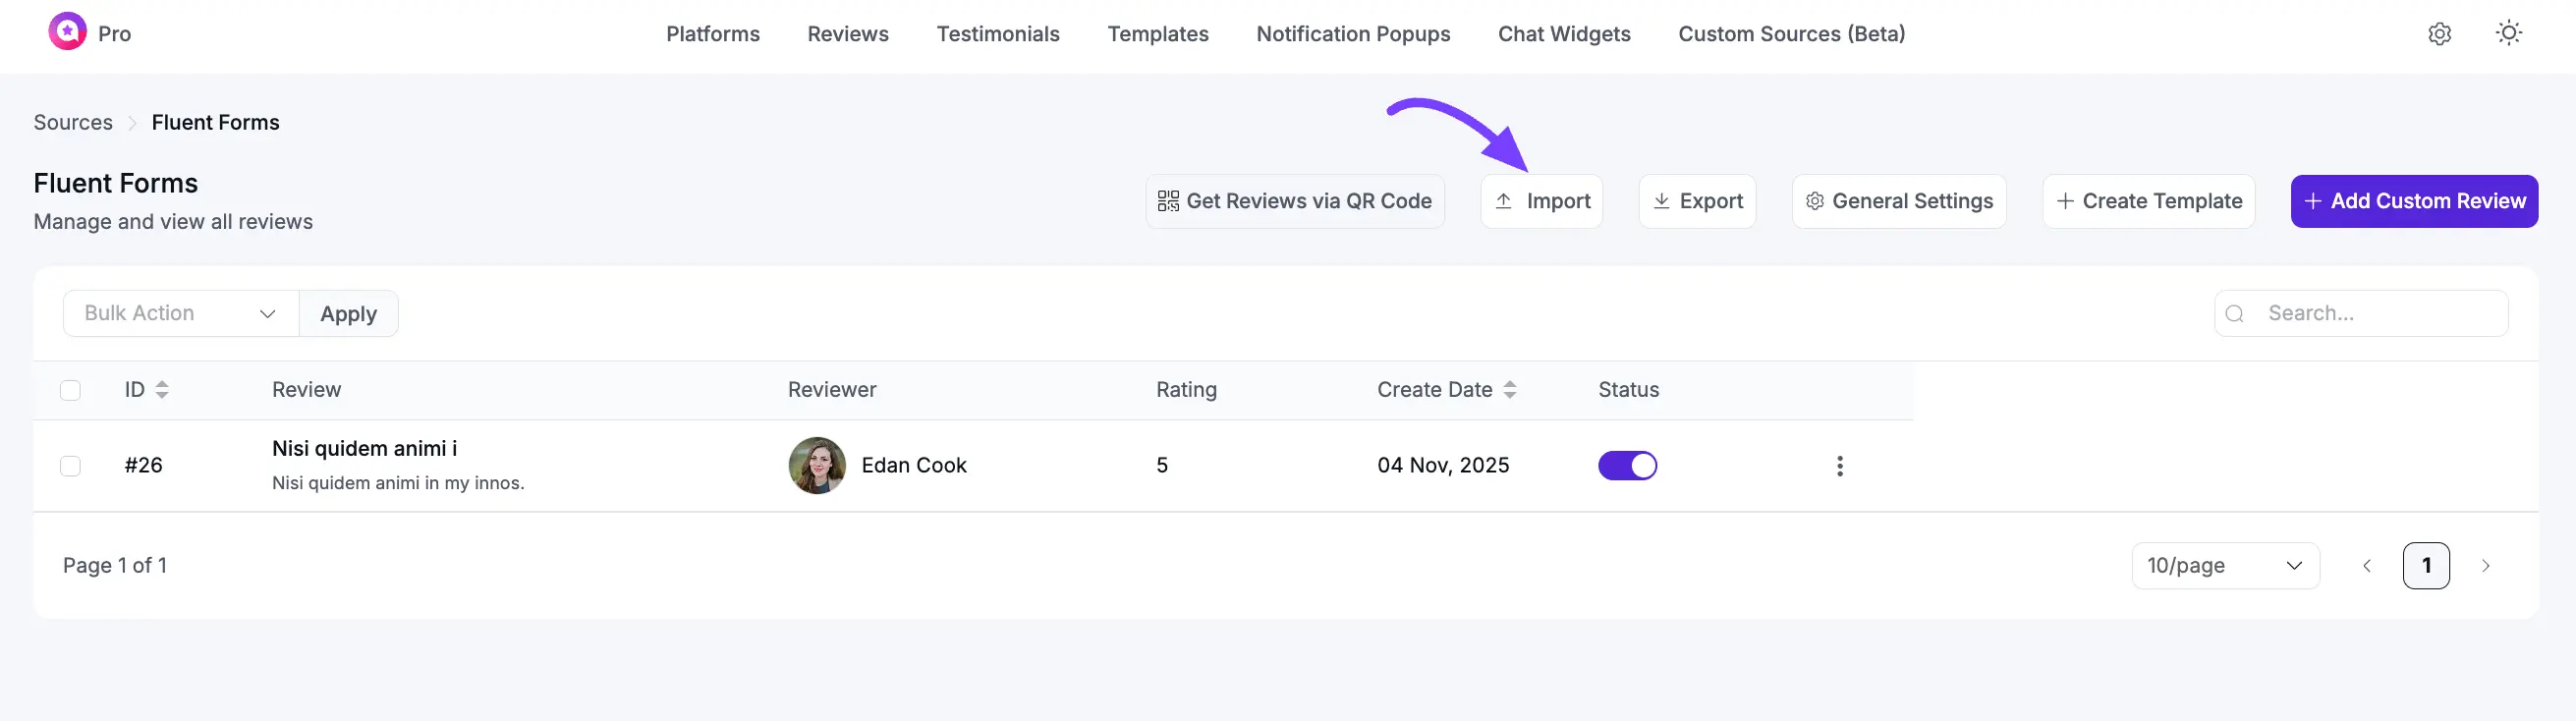
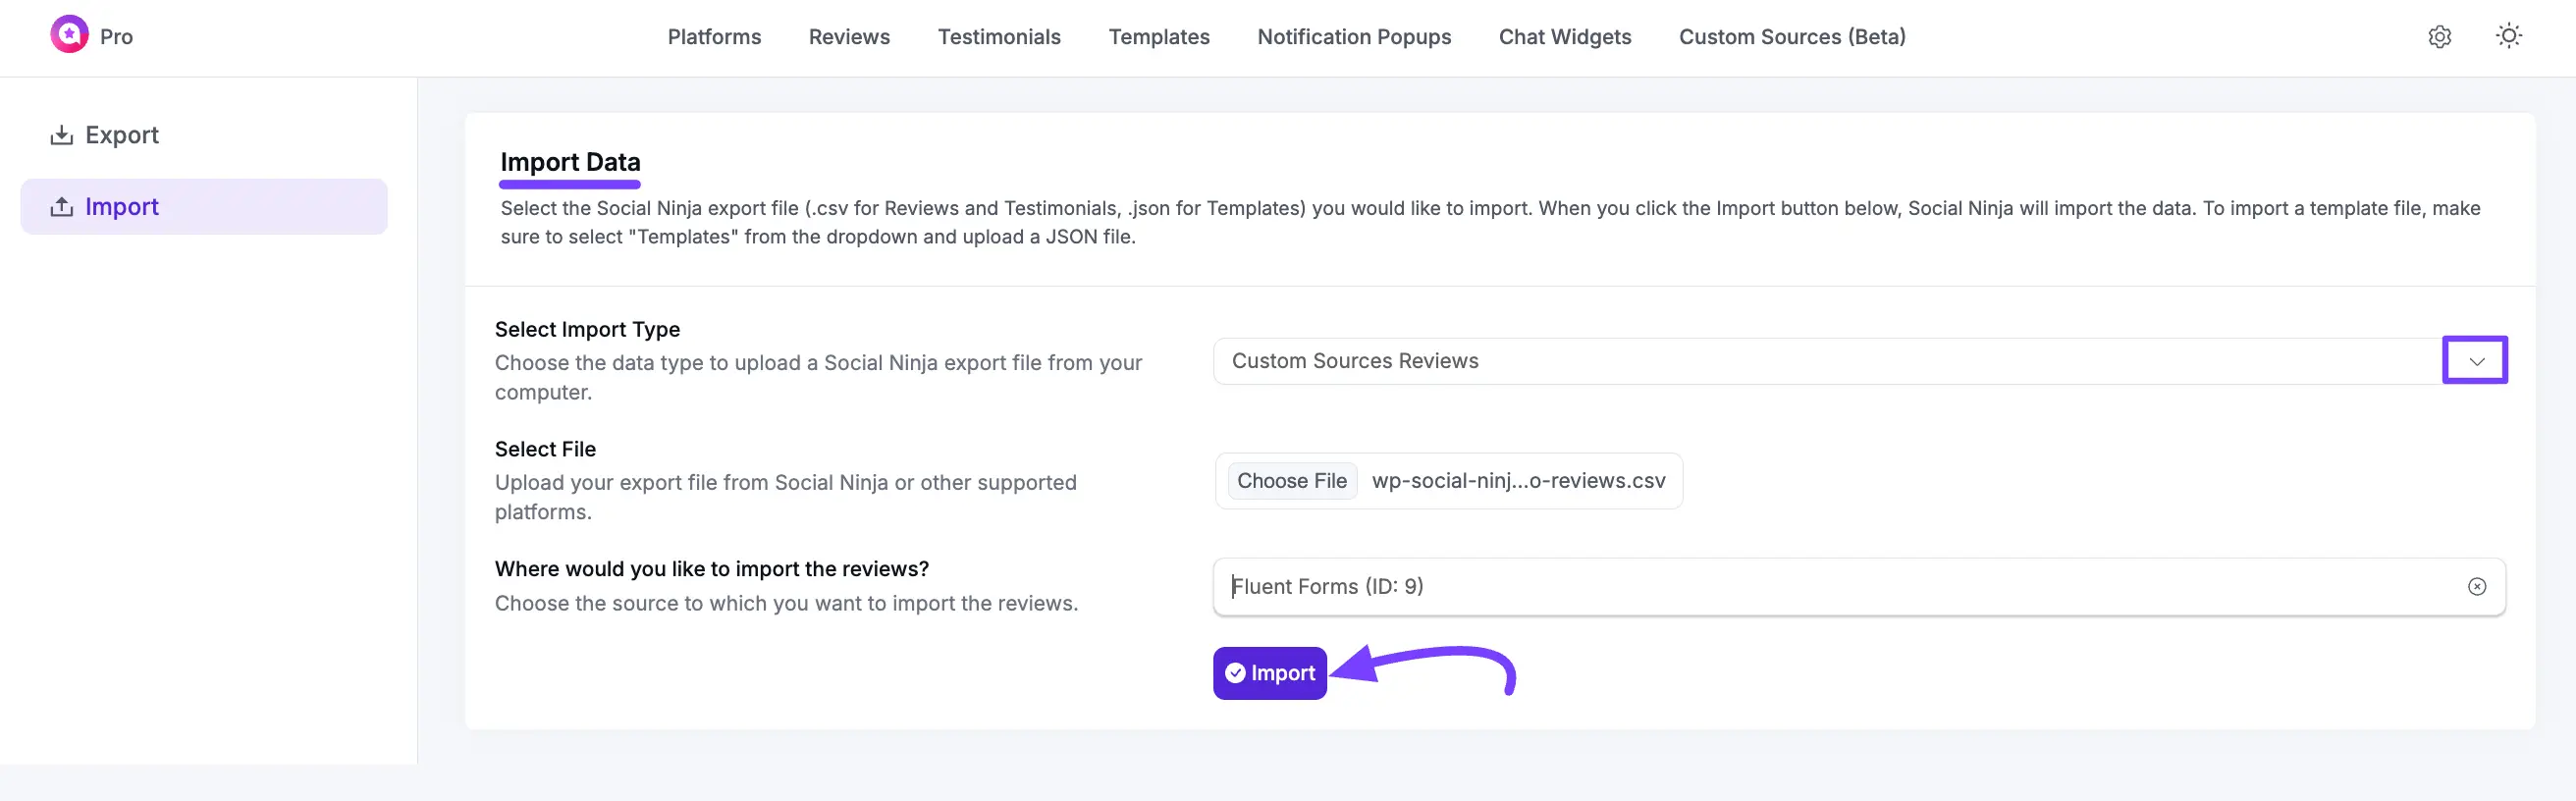
To start, go to your source’s dashboard and click the Import button at the top of the page.
Next, select the Form ID where you want to import these reviews from the dropdown list.
Once everything is set, click the Import button. All your reviews will be automatically added to your source. If you’d like to know more about exporting or importing reviews, check out the detailed Export/Import Documentation.
Step 3: Manage and Brand Your Source
Once your source is created and your Fluent Form is connected, you can manage all incoming reviews and customize your source's branding.
Manage Reviews
As visitors submit their reviews through your form, they will appear in this dashboard. Use the Status toggle to approve (make public) or hide any review. You can also click the three-dot menu to Edit, Duplicate, or Delete a review.
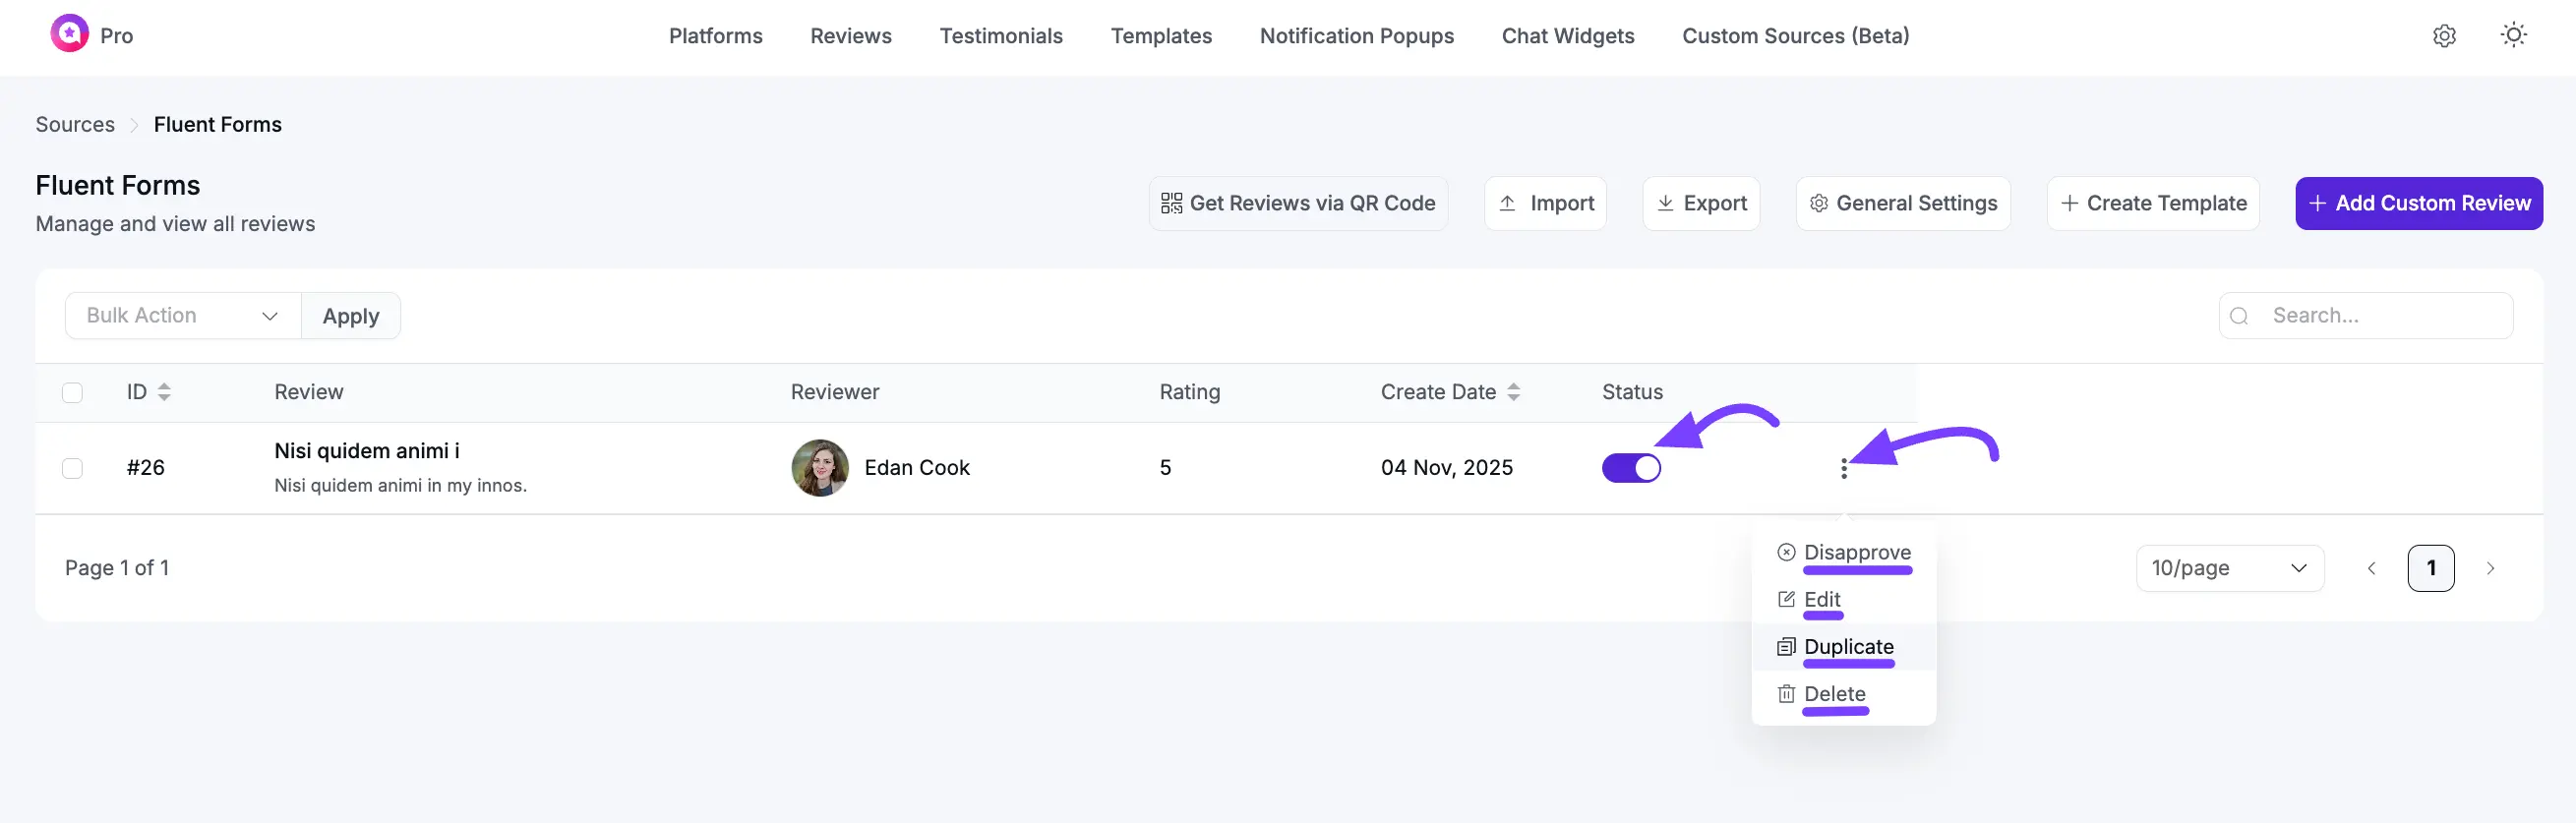
Get Reviews via QR Code
This button generates a QR code that you can share. When scanned, it will take users directly to the page containing your review form, making it easy to collect feedback. To know more about QR codes, read this documentation.
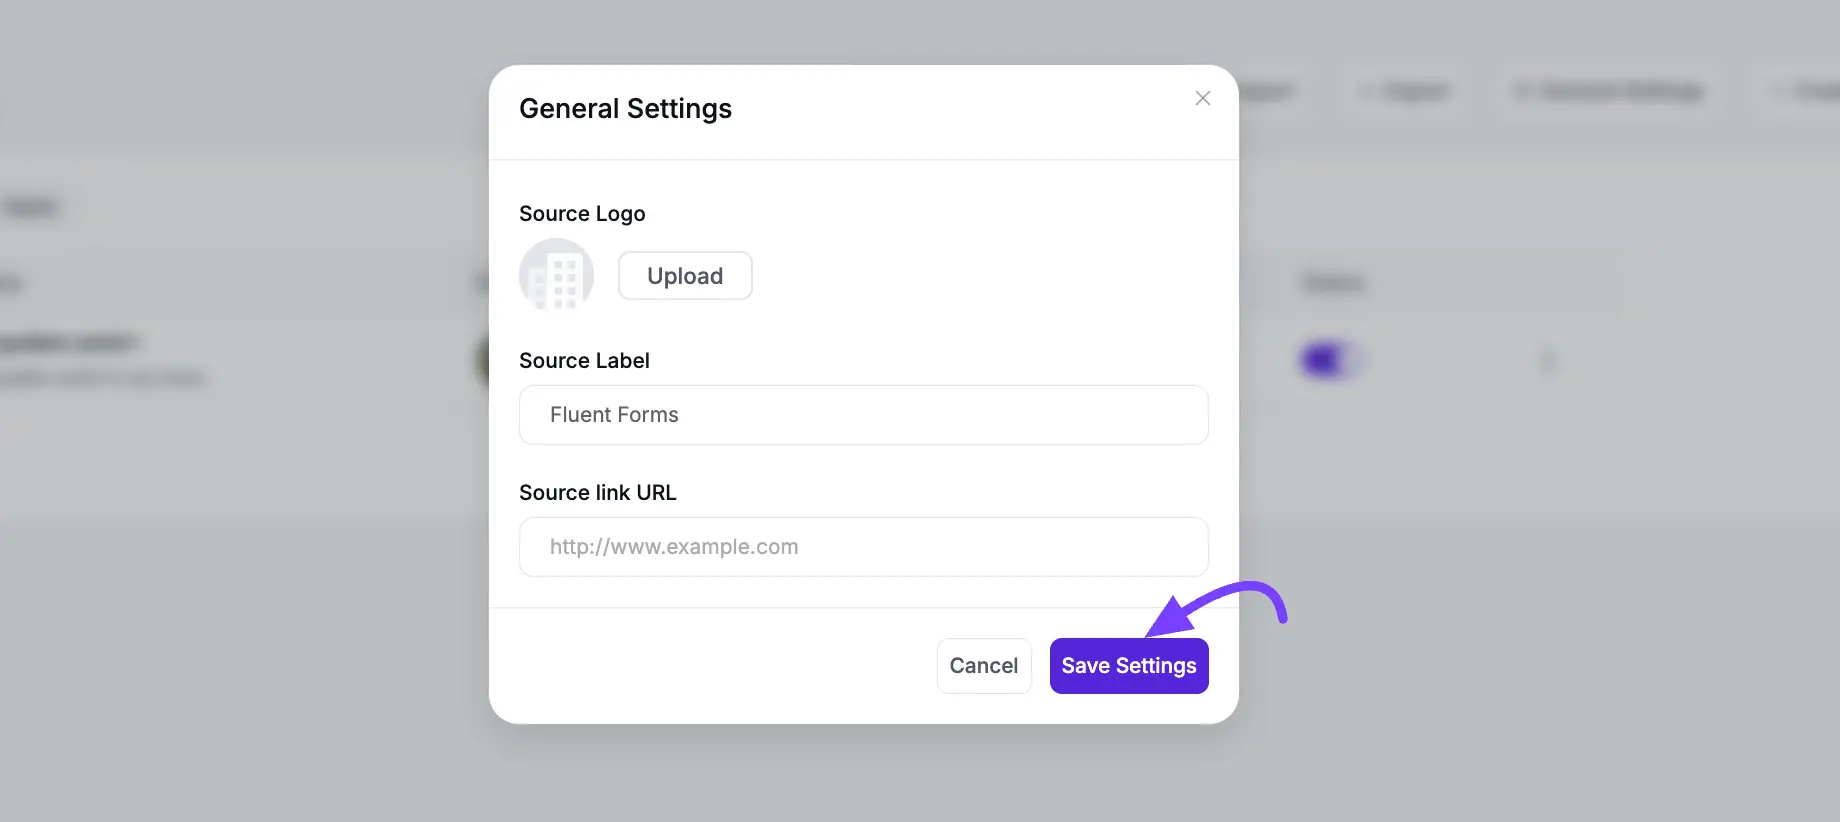
Brand Your Source
Click General Settings to open a pop-up where you can upload a Source Logo (like your business logo), update the Source Label, and add a Source Link URL. These details will appear in your review templates, helping you maintain a consistent and professional brand look. Once done, click Save Settings.
Step 4: Display Your Reviews on Your Website
Now that your source is set up to collect reviews, you can showcase them anywhere on your site.
Go to WP Social Ninja → Templates and create a new Review Template (or edit an existing one). In the template editor, open General → Platforms. Find and select your newly created source (e.g., Student Testimonials).
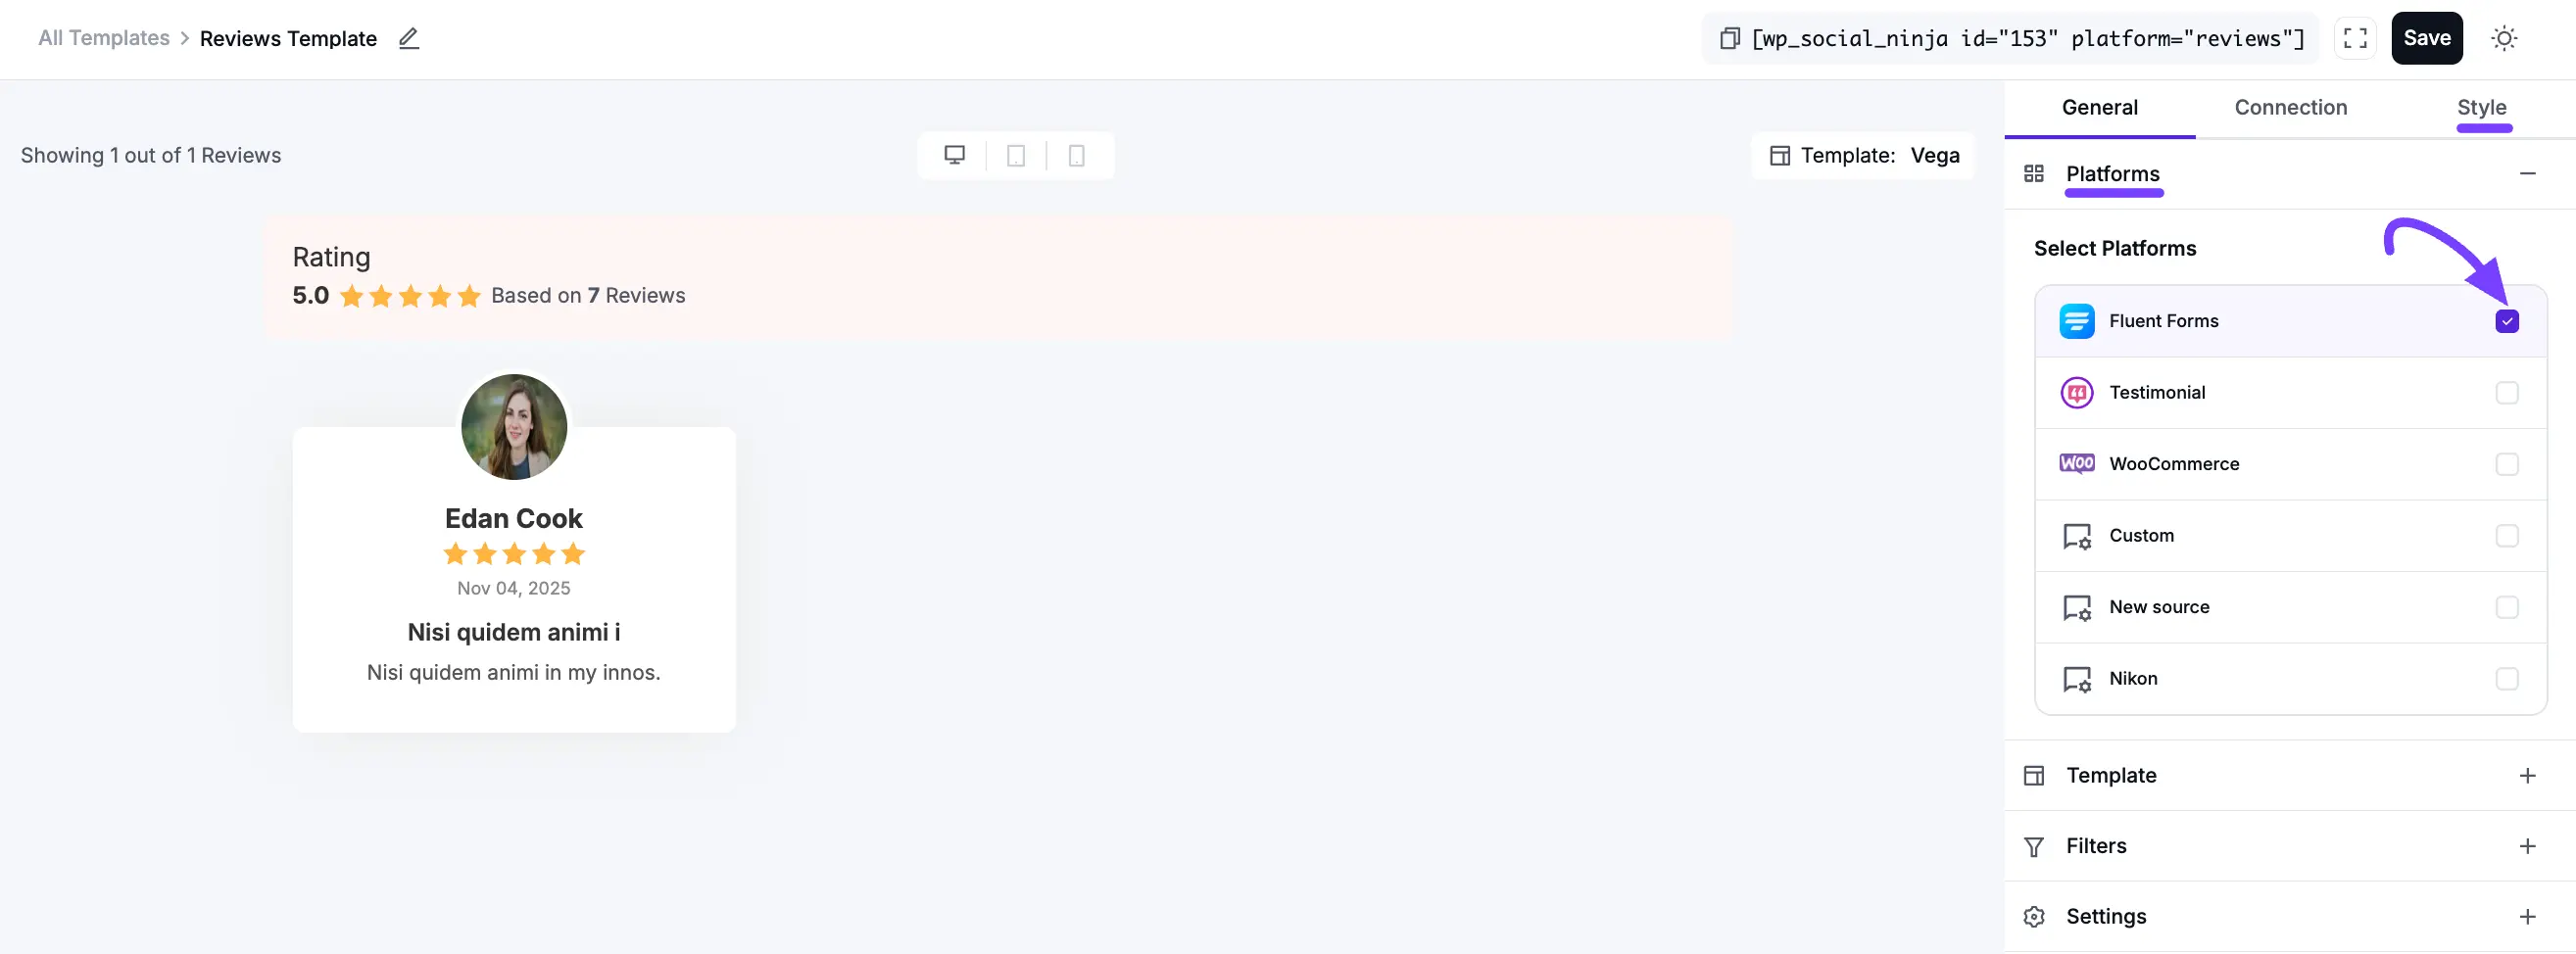 Now, you can customize the design under the Style tab to match your website’s look. Click Save Template when you're done.
NOTE
If you want to learn more about the template styling, then see the documentation.
Your template will generate a shortcode. Simply copy and paste it into any page, post, or widget area to display your new, form-collected reviews beautifully on your website!